Build Environment
- Android Studio 4.2.1
- Gradle 6.7.1
- Hiya Jacoco Plugin 0.2
- SonarQube 8.9.1
Hi everyone,
I’ve been working on coverage reports in Android and sending them to SonarQube in the last couple of weeks and I want to share my experience here.
If you want to go to the Github repo directly. It’s here.
First of all, I want to say I’ve tried different Gradle modules and different methods but I encountered some problems and in the end, I decided to use this one. There might be better solutions out there, but I don’t know them yet, so please add comments and let me know.
To demonstrate properly I am using a multi-module Android project both have activity and example UI tests.
Unit Tests
In Java, Jacoco is the main plugin used for generating coverage reports for many years and it is actually built-in in Android Studio. If you go to your test folder and right-click you will see an option that gives you coverage reports.

But since I couldn’t find a way to run this operation from Terminal, we will use this plugin. The installation is pretty straightforward. You only need to add the dependency and it is ready to run.
*I encounter a problem when I use DSL so I am gonna use the legacy application way.
buildscript {
  repositories {
    maven {
      url "https://plugins.gradle.org/m2/"
    }
  }
  dependencies {
    classpath "com.hiya:jacoco-android:0.2"
  }
}

apply plugin: "com.hiya.jacoco-android"
And then sync the Gradle.
After syncing the Gradle we have some extra Gradle commands. If you run ./gradlew tasks it is gonna show you all available commands and you will see this.

Since I have two build variants in my project it shows two report commands and one at the bottom to run all of them at once.
I don’t want to run all of them and spend so much time so I am gonna run ./gradlew jacocoTestDebugUnitTestReport
When Gradle finishes the job go to {your-project}/app/build/jacoco. You will see an Html folder, an XML file, and a .exec file. Exec is not used in the new SonarQube anymore so we can ignore it. Later I am gonna show how to configure some parameters of Jacoco to ignore report types but now let’s continue to explore Jacoco folder. We are gonna use the XML file to send to SonarQube and finally, we have an Html folder. We can visually look at our coverage report with it.
If you open the Html folder and click the index.html you will see the unit test coverage reports. Since it is for unit tests you won’t see coverage for the activities. We are gonna use something else to get coverage report for UI tests.

But if you pay more attention there isn’t any report for our library module because we didn’t add the Jacoco plugin to our library module.
Now there are some ways to apply a plugin to all subprojects but I am gonna go simple and apply the same plugin to library build.gradle.
apply plugin: "com.hiya.jacoco-android"Now run the ./gradlew jacocoTestDebugUnitTestReport and go to {your-project/mylibrary/build/jacoco}. You will see the same files in there, too. Open the Html folder and click the index.html, you will see the coverage report for your library.

If you are using this in CI/CD pipelines you may not want to generate .exec and Html files. You can see the configurable parameters on the plugin’s Github page but basically, you need to add these to your Gradle files and you are ready to go.
jacocoAndroidUnitTestReport {
  csv.enabled false
  html.enabled false
  xml.enabled true
}
UI Tests
Now we are finished with the unit test coverage reports. Let’s move to UI tests.
We are gonna use a built-in coverage tool to get the reports for UI tests. To do that you need to add the testCoverageEnabled key to both Gradle files.
*Quick note about this key that if you just put true, it is gonna run every time you build your project and slow down your builds so I recommend checking this article.
buildTypes {
    debug {
        ...
        testCoverageEnabled true
    }
}
When you sync the Gradle and run the ./gradlew tasks command again you will see we have one extra command available under the verification section.

This command gives you the coverage reports for the UI tests. So run ./gradlew createDebugCoverageReport and wait for it to be finished.
This time our reports are in {your-project}/{app or mylibrary}/build/reports/coverage/debug
When you open the folder you will see we have an Html and an XML file. Same as before, we will send the XML file to SonarQube and look at our coverage visually with the Html file.


SonarQube
If you followed the tutorial so far correctly you have the unit tests and UI tests coverage reports for your all modules. Now we can send our reports to SonarQube.
SonarQube Installation
If you know how to setup SonarQube or if you already have an instance running on cloud you can skip this section.
I am gonna use a local SonarQube instance on Docker.
*Currently the latest SonarQube LTS version is 8.9 and I’ve tested this on the version 8.9.1.
To fetch the image, run in Docker and connect to port we need to run this command in Terminal.
docker run -d --name sonarqube -p 9000:9000 sonarqube:8.9.1-community
When docker completes the process open http://localhost:9000 and you should be able to see the SonarQube.

*Default username and password is admin
Click to Add Project in top right corner and select manually.

Enter a project key and continue with Set up.

Now you need to generate a token. Give a name to your token and click Generate.


Now you are ready to send your reports to SonarQube. In the second step, you can choose your project type and SonarQube shows you how to send your reports.

Sending Reports
Now our SonarQube instance is ready. All we need to do is add some configurations to the root build.gradle file and run it.
First we need SonarQube plugin. We need to add this to our root build.gradle file.
plugins {
    id "org.sonarqube" version "3.2.0"
}
And then our configuration for SonarQube. Now you may think of the security of your token here. That’s true. For demonstration purposes, I just put it in Gradle but you can hide it in your gradle.properties, or you can use the terminal way which describes in the above picture and put the token to environment variables in CI/CD pipelines.
sonarqube {
    properties {
        property "sonar.host.url", "http://localhost:9000"
        property "sonar.login", "75495c5c15806c3aa0a63f108abce582f3a757c9"
        property "sonar.projectKey", "com.vsahin.coveragereport"
        property "sonar.coverage.jacoco.xmlReportPaths", [
                "${rootDir}/app/build/jacoco/jacoco.xml", //unit tests,
                "${rootDir}/app/build/reports/coverage/debug/report.xml", //ui tests
                "${rootDir}/mylibrary/build/jacoco/jacoco.xml", //unit tests library
                "${rootDir}/mylibrary/build/reports/coverage/debug/report.xml", //ui tests library
        ]
    }
}
You can find all available SonarQube parameters from here.
Now sync the project and run the ./gradlew sonarqube
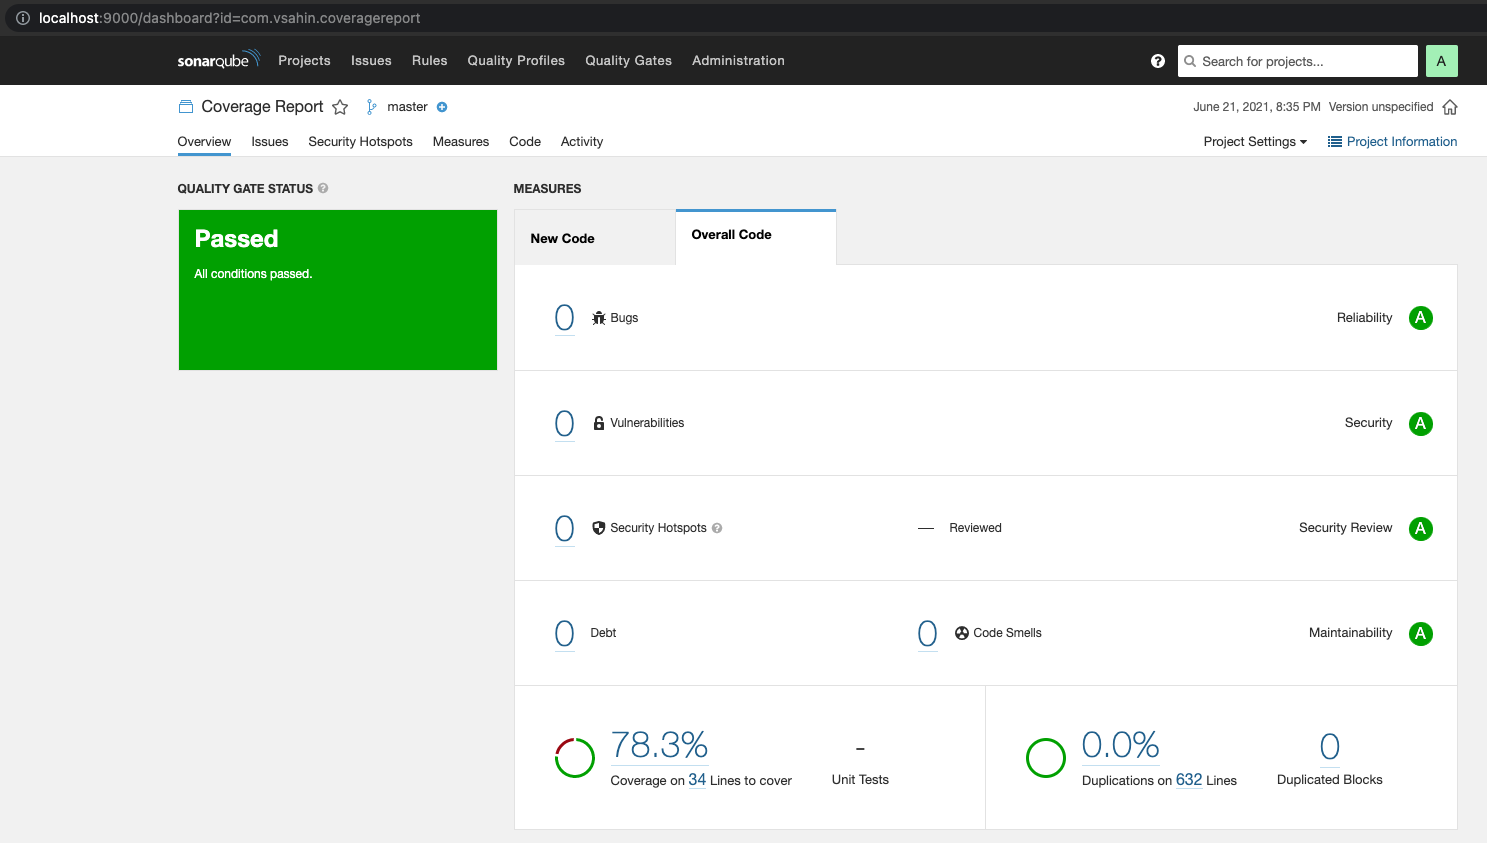
If everything goes alright you will see your coverage ratio in SonarQube. Congratulations! 💪🏻

Hi,
Thanks for sharing the working solution. Could you please help me to understand how to get the combine unit & UI test cases report. As of now we are using two different commands and getting this report in separate .HTML file. I want my Unit & UI test case combined report in a single file.
Could you please help me with it.
My first attempt was also trying to create a merged report but then I couldn’t find a proper solution and chose to send multiple reports to Sonarqube.
Alright, thanks for the quick response.